Induction Cooktops Boom: Kitchens Go Electric
As a contractor who has remodeled hundreds of kitchens, I observe that the shift toward electric cooking represents a substantial change. Homeowners increasingly select induction cooktops over gas options for superior performance, enhanced safety, and energy savings. This transition influences kitchen design, wiring, and ventilation. Individuals planning a full remodel or a simple range replacement benefit from understanding these implications prior to purchasing appliances.
The Hidden Costs of Holding Onto Gas
Numerous homeowners assume that retaining a gas system maintains simplicity. They frequently state, "I already have a gas line, so I will continue using it." Individuals often overlook the persistent expenses and hazards associated with gas systems, which receive little attention during initial setup.
- Gas leaks and safety risks – A minor leak poses significant dangers. Connections loosen over time, particularly during appliance movement for cleaning or renovations.
- Ventilation demands – Gas ranges emit carbon monoxide, nitrogen dioxide, and additional combustion byproducts. Inadequate venting allows these gases to accumulate indoors.
- Rising maintenance costs – Gas valves, igniters, and burners necessitate regular servicing, while parts grow scarce as manufacturers reduce production.
- Building code changes – Municipalities impose stricter gas installation standards. These requirements lead to extra permits, inspections, and potential upgrades at additional expense.
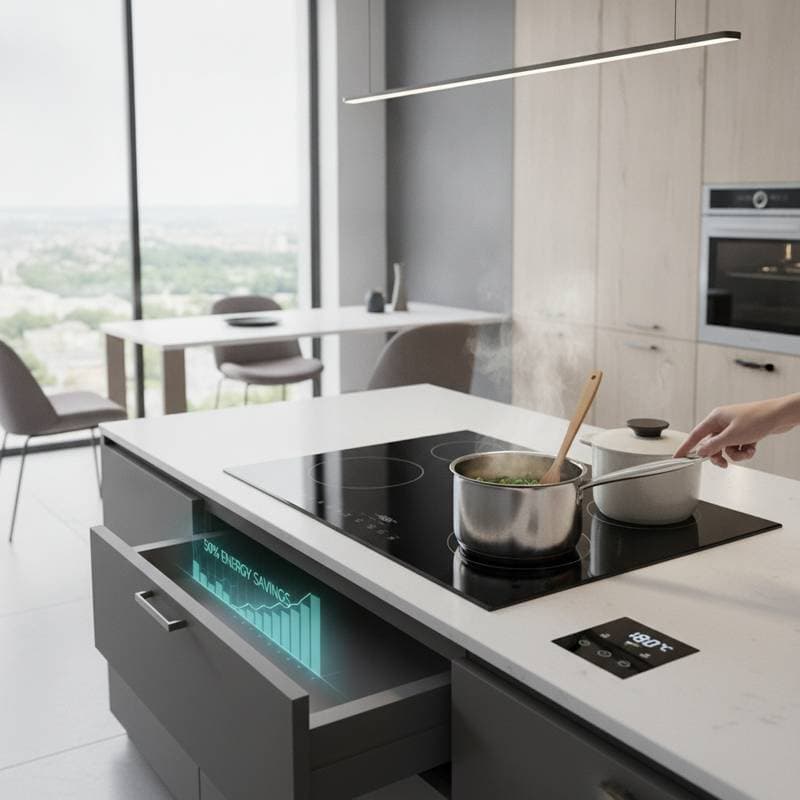
In comparison, an induction cooktop avoids combustion completely. It employs magnetic energy to heat cookware directly, eliminating open flames, gas lines, and fuel exhaust.
Why Homeowners Are Making the Switch
Induction cooking technology has existed for decades, yet recent advancements in pricing, performance, and aesthetics position it as a viable alternative to gas. The motivations for this change stem from practicality rather than fleeting fashion.
- Speed and precision – Induction heats cookware more rapidly than gas and provides precise temperature regulation. Water reaches a boil swiftly, and sauces simmer consistently without frequent adjustments.
- Energy efficiency – Approximately 85 to 90 percent of energy transfers directly to the pan, versus about half for gas. Reduced heat loss translates to decreased utility expenses and a more comfortable kitchen environment.
- Safety – The cooktop surface remains comparatively cool, minimizing burn risks. Heating ceases instantly upon pot removal.
- Cleanliness – Spills fail to adhere to the surface, and no grates or burners require disassembly. A simple wipe maintains a pristine appearance.
- Design flexibility – Induction units feature streamlined, flush-mounted profiles that complement contemporary kitchens. Many prefer the unobstructed aesthetic and additional counter space.
These advantages drive growing demand, though they introduce technical considerations that homeowners sometimes neglect.
Understanding the Electrical Demands
A gas cooktop relies on minimal electricity for ignition, whereas an induction unit consumes considerable power. Most models demand a dedicated 240-volt circuit, akin to those for ovens or dryers. In my experience as a contractor, this aspect frequently causes complications. Homeowners purchase the appliance before assessing their electrical panel's capacity.
Consult a licensed electrician for a service panel inspection prior to acquisition. Pose these inquiries:
- Is space available for a new double-pole breaker? Induction cooktops typically require one.
- What constitutes the total amperage of the service? Older residences often feature 100-amp panels, insufficient for added high-demand appliances.
- Does capacity exist for future upgrades? Plans for full electrification, such as electric water heaters, heat pumps, or vehicle chargers, warrant consideration of expanded service.
Electrical service upgrades incur expenses, yet integration during a remodel proves more straightforward and economical than subsequent retrofits.
Proper Installation Matters
The installation of an induction cooktop appears straightforward, but precise execution ensures optimal performance and safety. I have rectified numerous setups performed by general electricians or handymen who deviated from manufacturer guidelines.
- Ventilation – Induction generates heat despite lacking combustion gases. Cabinets require sufficient airflow, and built-in units necessitate clearance below.
- Cutout accuracy – Countertop openings demand exact dimensions to avoid gaps or stress that lead to cracking. Adhere strictly to the manufacturer's template.
- Electrical connection – Units connect through hardwiring rather than plugs. Secure connections within an approved junction box, using appropriate wire gauge and breaker size.
- Surface support – Reinforce stone or solid-surface countertops adequately. Induction units, particularly with downdraft systems, carry greater weight than conventional cooktops.
- Testing and calibration – Power the unit post-installation, verify functionality, and test with compatible cookware.
Request evidence of prior induction installation experience from contractors or electricians. Precision remains essential in this process.
Converting From Gas to Electric
Transitioning from gas to induction extends beyond appliance replacement. Professionals must cap and seal the gas line securely, confirm electrical adequacy, and adjust cabinetry as needed. Follow this sequence for conversions, based on my standard procedure:
- Shut off and disconnect gas – A licensed plumber or gas fitter caps the line with certified fittings. Avoid improvised seals or tape.
- Remove old unit and inspect cabinetry – Gas cooktops utilize deeper housings. Shallower induction models may reveal unfinished areas or voids.
- Install new electrical circuit – Extend the circuit from the panel to the cooktop site, employing conduit and amperage-rated wiring.
- Modify the countertop cutout – Adjust for size differences using a template, cutting meticulously to prevent chipping.
- Secure and connect – Mount the unit per manufacturer directions, attach wiring, and restore power.
- Test thoroughly – Confirm burner operation, absence of error codes, and effective ventilation.
Adhering to this order averts damage, upholds code compliance, and conserves effort. Omitting inspections has led clients to encounter frequent circuit tripping during cooking.
Choosing the Right Induction Cooktop
Model selection varies by household needs, space constraints, and electrical provisions. Consider cooking routines, dimensions, and power availability when deciding.
- Size and configuration – Common widths measure 30 or 36 inches, with compact or modular variants available. Measure spaces accurately before purchase.
- Power output – Select units with at least one high-wattage burner for tasks involving large pans or rapid boiling.
- Controls and layout – Touch interfaces appear modern but may challenge some users. Knob controls provide reliable tactile response.
- Cookware compatibility – Magnetic materials prove essential. Stainless steel and cast iron function effectively; aluminum or copper requires magnetic bases.
- Noise and fan operation – Certain models emit humming or clicking sounds. Premium options reduce these effects; review user feedback for insights.
Verify installation specifications prior to commitment. During remodels, align appliance choices with countertop and electrical timelines from the outset.
Budgeting for an Induction Transition
Transition expenses fluctuate based on existing infrastructure. This breakdown draws from completed projects:
- Cooktop unit: $1,200 to $3,000 for reliable models
- Electrical work: $500 to $2,500, contingent on panel enhancements
- Cabinet and countertop modifications: $300 to $1,000
- Gas line capping: $150 to $400
- Permits and inspections: $100 to $350
A complete conversion typically spans $2,000 to $6,000. This outlay enhances safety, efficiency, and property appeal, as prospective buyers prioritize all-electric features in emerging markets.
Common Mistakes to Avoid
Rushed decisions lead even diligent homeowners to errors. These frequent issues arise in my observations:
- Skipping the electrical evaluation – Older homes often lack sufficient load capacity without modifications.
- Ignoring ventilation – Absence of gas flames does not eliminate the need for odor and steam extraction.
- Overlooking cookware – Non-magnetic items fail to heat. Verify existing pans with a magnet pre-installation.
- DIY electrical work – Unauthorized high-voltage wiring poses risks and may invalidate warranties.
- Assuming all induction units perform the same – Variations exist between basic and advanced models in responsiveness and sound levels.
Addressing errors post-installation exceeds the cost of initial diligence. Methodical planning safeguards finances and well-being.
Long-Term Maintenance and Care
Induction cooktops demand less upkeep than gas counterparts, yet consistent care prolongs durability. Refrain from abrasive cleaners to prevent glass surface scratches. Keep magnetic items, such as knives or phones, distant from active zones. Professional inspection follows circuit trips or error indications, rather than repeated resets.
Service requests for induction systems typically trace to installation flaws or electrical oversights, not inherent defects. Well-installed units endure for years with routine attention.
Maximizing Benefits in Your Electric Kitchen
Embrace the advantages of induction by integrating complementary features, such as under-cabinet lighting or integrated appliances. Regular use reveals efficiencies in daily meal preparation, from precise searing to effortless cleanup. This upgrade not only streamlines routines but also aligns with sustainable home practices, yielding lasting satisfaction.