Why Zero-Threshold Showers Enhance Safety in Aging-in-Place Homes
Homeowners often overlook the subtle risks in everyday routines, such as entering a shower. A raised curb at the shower base can lead to trips, particularly on wet surfaces, increasing the likelihood of falls. For individuals planning to age in place, these hazards become more significant over time.
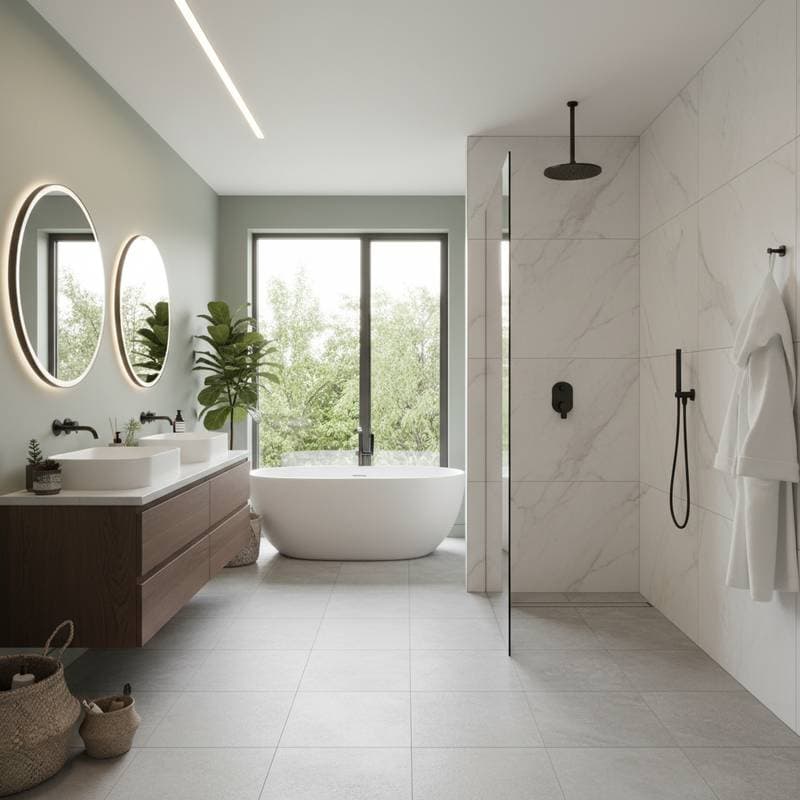
Zero-threshold showers eliminate this barrier by providing a seamless transition from the bathroom floor to the shower area. This design promotes safety, accessibility, and an open aesthetic. Property owners who prioritize long-term independence find these showers essential for maintaining comfort without major lifestyle changes.
This article explores the mechanics of zero-threshold showers, installation processes, design enhancements, and their broader benefits. Readers gain practical insights to evaluate whether this upgrade suits their home.
Understanding Zero-Threshold Showers and Their Functionality
A zero-threshold shower features a floor that aligns perfectly with the surrounding bathroom surface, without any raised edge or step. Water drains through a gentle slope toward a dedicated system, preventing leaks into adjacent areas. This configuration ensures efficient water management while preserving a spacious feel.
Builders achieve the slope by adjusting the subfloor during construction. In existing homes, professionals modify the underlying structure to accommodate the pitch, which directs water to the drain. New constructions integrate this feature more straightforwardly, often at lower costs due to planned plumbing alignments.
The result is a shower that supports mobility aids like wheelchairs or walkers, as the entry remains unobstructed. Maintenance proves simpler, with fewer crevices for mold or grime to accumulate. Homeowners appreciate the modern look that blends seamlessly with contemporary bathroom designs.
Key Steps in Planning a Zero-Threshold Shower Installation
Retrofitting a bathroom for a zero-threshold shower requires careful assessment of the current setup. Factors such as floor type and plumbing location influence the approach. Professionals recommend consulting a licensed contractor early to map out feasible options.
Assess the Bathroom Structure
Begin by examining the foundation beneath the bathroom floor. Concrete slabs demand precise cuts to create the necessary slope, which elevates labor demands and expenses. Wood-framed floors allow for joist adjustments or subfloor recessing, offering more flexibility in modifications.
A structural engineer or experienced plumber evaluates load-bearing elements to ensure stability post-installation. This step prevents future issues like uneven settling or drainage failures. Document findings to inform material selections and permit applications.
Select an Appropriate Drain Configuration
Drain choices affect both aesthetics and usability. Center drains necessitate a multi-directional slope, complicating tile layouts and potentially creating subtle ridges underfoot. Linear drains, positioned along a wall or entry point, enable a uniform single-plane slope.
Opt for linear drains in accessibility-focused designs, as they accommodate larger tiles and facilitate smooth passage for mobility devices. Stainless steel or polymer options resist corrosion and integrate with various finishes. Test slope prototypes if custom tiling is involved to verify water flow efficiency.
Establish a Budget Framework
Installation expenses fluctuate based on scope and materials. Prefabricated kits suitable for basic setups range from $2,000 to $4,000, covering essential components like pans and drains. Custom tiled installations typically fall between $5,000 and $9,000, incorporating personalized layouts.
Complex projects involving structural reinforcements or fixture relocations may exceed $10,000 to $15,000. Factor in variables such as premium tiles, specialized waterproofing, and regional labor costs. Obtain multiple quotes from certified installers to compare value and timelines.
Prioritize Waterproofing and Compliance
Effective waterproofing extends beyond the shower boundaries to protect adjacent flooring and walls. Installers apply robust membranes, such as liquid-applied systems or sheet barriers, overlapping seams by at least six inches. This precaution mitigates moisture penetration risks.
Local building codes often mandate permits for plumbing alterations or floor modifications. Verify requirements through municipal offices to avoid fines or rework. Engage certified professionals who adhere to standards like those from the International Plumbing Code for reliable outcomes.
Integrating Safety and Comfort Features
A zero-threshold shower serves as a foundation for comprehensive bathroom enhancements. Pair it with elements that address mobility, visibility, and ergonomics to create a supportive environment.
Install Support and Flexibility Aids
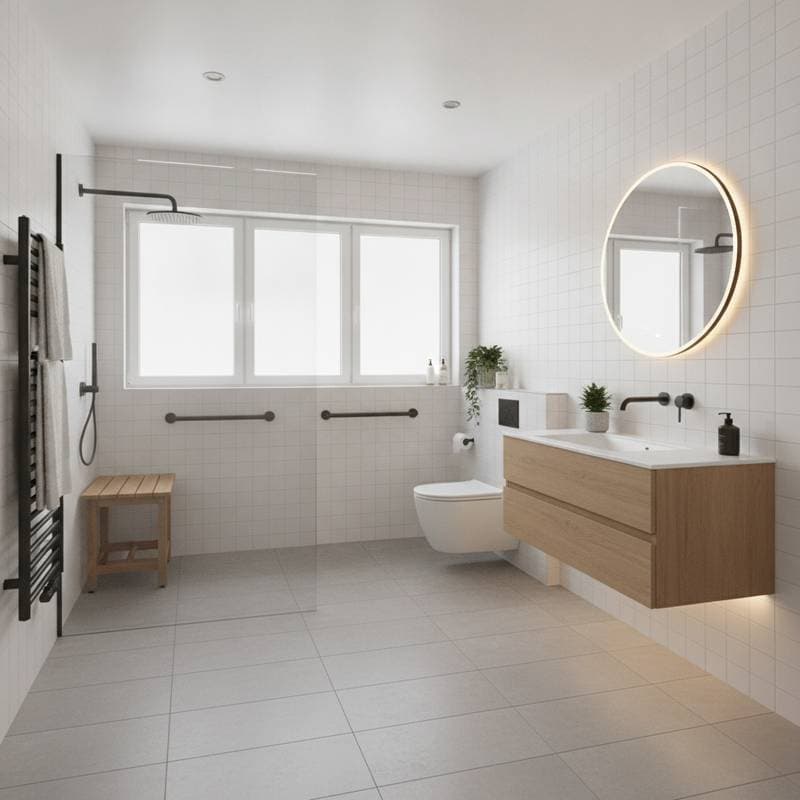
Position grab bars at entry points and within the shower for secure handholds. Select ADA-compliant models with concealed mounting for a sleek appearance. Pair them with a handheld showerhead on a height-adjustable rail, enabling seated or standing use as preferences evolve.
Choose Traction-Enhanced Surfaces
Select flooring with high slip-resistance coefficients, such as porcelain tiles featuring textured patterns or matte finishes. Mosaic arrangements increase grout line grip, while vinyl composites offer durability without fragility. Test samples under wet conditions to confirm performance.
Incorporate Seating Options
Integrate a fixed bench from durable, water-resistant materials like teak or composite stone, positioned for easy reach. Foldable seats provide versatility for occasional needs. Ensure seating heights align with user ergonomics, typically 17 to 19 inches from the floor.
Enhance Illumination and Controls
Install layered lighting, including overhead fixtures and task-oriented strips, to eliminate dark spots. Thermostatic valves regulate water temperature to 120 degrees Fahrenheit maximum, preventing burns. Dimmable options allow customization for relaxation or alertness.
Managing Installation Timeline and Minimal Disruption
Projects vary in duration based on complexity. Basic retrofits conclude in five to seven days, focusing on localized changes. Comprehensive remodels extend to three weeks, encompassing demolition and finishing.
Prepare by arranging alternative bathing facilities, such as portable units or guest bathroom access. Schedule during less disruptive periods, like vacations, to reduce daily impacts. Communicate progress updates with household members to maintain routines.
Proactive installation before health challenges arise allows controlled execution. This foresight preserves autonomy and avoids rushed decisions following incidents.
Realizing Lasting Benefits and Home Value
Beyond immediate safety, zero-threshold showers contribute to enduring well-being. They foster confidence in daily self-care, reducing reliance on assistance. The open design elevates bathroom aesthetics, appealing to diverse demographics.
In real estate, accessible features attract buyers seeking adaptable spaces. While full cost recovery varies by market, the enhancement often yields premium pricing. View the investment as securing healthspan, where comfort translates to intangible gains in quality of life.
Steps to Implement Your Zero-Threshold Upgrade
Start by scheduling a professional consultation to review your bathroom's feasibility. Gather inspiration from design resources and prioritize must-have features like drains and waterproofing. Secure financing and permits promptly to initiate the process.
Monitor progress through milestones, from demolition to final sealing. Post-installation, perform routine maintenance, such as clearing drains and inspecting seals annually. This upgrade transforms your bathroom into a sanctuary of safety and style, supporting your vision for aging in place.